HMS Warspite was a 74-gun Third Rate ship of the line of the Dublin Class, built under Navy Board contract by Thomas West at his Deptford shipyard.
The Dublin Class was a group of 7 ships and they represented the first serious attempt by the Royal Navy to build something to match the (at the time) far superior 74 gun ships the French had been building since the 1730's. Of the seven Dublin Class ships, six were built in Kent shipyards.
In the first half of the 18th century, the Royal Navy was under the control of two organisations. The Navy Board was responsible for amongst other things, the design and construction of warships and the organisation of the Royal Dockyards. The Lords Commissioners of the Admiralty was responsible for the day-to-day operations and deployment of the fleet. The two organisations were often at loggerheads, particularly when it came to the design and ordering of ships.
The Navy Board was at time, controlled by conservative men, resistant to change, even when tactical considerations demanded it. They were in favour of standardisation of ship design and for that reason, issued what were called "Establishments". An Establishment was a set of detailed specifications within which the Master Shipwright at the building yard was expected to design and build a vessel. The 1745 Establishment for the Third Rate ship of the line, forming the backbone of the fleet, called for two types of ship - a ship of 70 guns on two gundecks and a ship of 80 guns with three. Experience during the War of Jenkins Ear, part of the greater War of Austrian Succession (1739 - 1748) had shown that the 70 gun ship carried her lower gundeck too close to the waterline and were unable to open their lower gundeck gunports in anything other than reasonablr calm weather. The 80 gun ship was too high, too short and too cumbersome and only two were built under the 1745 Establishment. British naval successes in those wars came about as a result of more aggressive tactics and superior weight of numbers. In the 1730's the French had started to build 74 gun two-deckers, which were significantly faster, more manoeuvrable and better armed than the equivalent British ships.
On 14th May 1747, at the First Battle of Cape Finisterre, the British fleet commanded by Admiral Sir George Anson managed to capture one of the finest of the French 74 gun ships, L'Invincible. On being taken into the Royal Navy, she was found to be significantly superior to any ship of the line in British service. In ideal sailing conditions, the now HMS Invincible could manage up to 16 knots, three knots faster than the best of the 70 gun 3rd rates in service with the Royal Navy at the time. In those conditions, her lee (or downwind) lower deck gunports remained above water. The British 70 gun ships on the other hand, couldn't open the lee lower deck gunports in the same conditions for fear of sinking the ship. The Admiralty realised that they needed a comparable ship and began to pressure the Navy Board to order them. The Navy Board continued to resist change and issued an amendment to the 1745 Establishment in 1754 which reduced the number of guns on the lower gundeck in an effort to save weight and raise the height of the lower gundeck gunports above the waterline. It was not enough.
In 1755, the last of the old guard, Sir Joseph Allin, was taken ill and became "disordered in his senses". Surveyors of the Navy worked in pairs, but Allin's collegue, Sir Jacob Ackworth had died in 1749 and had not been replaced. Allin's place as Surveyor of the Navy (Chief Designer) was taken by Thomas Slade, previously Master Shipwright at Chatham and subsequently at Deptford Royal Dockyards. In addition, William Bately was already Assistant Surveyor and was promoted to be Slade's co-Surveyor. On 7th August 1755, both men took up their posts. They were under instructions to do things differently in that instead of ordering ships to be both designed and built in the shipyards, they were to design the ships themselves and then send the plans to the building yards. This would enable identical ships of the same class to be built by different shipyards; something which wasn't possible during the age of the Establishments.
The two men were acutely aware of the shortcomings of the 1745 Establishment design for Third rates and were determined to do something about it. They needed to - and in a hurry too. The treaty which ended the War of Austrian Succession in 1748 had left a lot of issues outstanding and by 1755, fighting between British and French forces had already broken out in the Ohio Territory in America, although war had yet to be formally declared, it was only a matter of time before it would be. Three weeks after their appointment, the Navy Board was ordered by the Privvy Council to "cause two ships each of 70 guns to be set up and built at Deptford". Slade very quickly produced a new design, based on the 1754 Amendment to the 1745 Establishment 70 gun ship. The new design however was 5 feet longer and over 100 tons heavier. The new ships were not 70 gun ships at all. They were, in fact, pierced for 74 guns, but for the next year or so, were still referred to as 70 gun ships. The Navy Board wasted no time in getting the Dublin Class ordered. The two ships ordered from the Deptford Royal Dockyard were HMS Dublin and HMS Norfolk, both ordered on the 26th August 1755. Orders for three more followed on the 28th October with contracts signed for HMS Shrewsbury from John Wells' shipyard in Deptford, HMS Mars ordered from the Woolwich Royal Dockyard and HMS Lennox ordered from the Chatham Royal Dockyard. The contract for the construction of HMS Warspite was signed on the 14th November 1755, while the contracts were signed for last of the class, HMS Resolution, with Henry Bird's shipyard at Northam in Devon on the 24th.
The first elm keel section of what was to become HMS Warspite was laid down by Thomas West's men during November of 1755 and construction proceeded rapidly. When the new ship was launched with all due ceremony into the River Thames on the 8th April 1758, the threatened war had broken out, so the ship was immediately taken to the Royal Dockyard at Deptfordto be fitted with her guns, masts and rigging. On the 15th May 1758, HMS Warspite was commissioned for the Channel Fleet under Captain Charles Holmes. On the 27th July 1758, HMS Warspite was declared complete at Deptford, but in the meantime, while she was being fitted out, she received a new commander, Captain John Bentley, on the 19th July.
The Kent-born John Bentley had been baptised at St.Leonards church in Deal on the 27th December 1703 and had entered the Royal Navy as Midshipman in Ordinary at the relatively late age of fifteen on the 27th November 1718. He had passed his Examination for Lieutenant on the 23rd November 1726 and was first made Master and Commander on the 6th March 1743. He was Posted, or promoted to Captain on the 1st August 1744 and his appointment prior to HMS Warspite had been in the aforementioned ex-French HMS Invincible.
On being appointed, Captain Bentley immediately set about recruiting a crew for his brand-new ship. His commissioned sea-officers were appointed by the Admiralty and the senior Warrant Officers, including the Standing Officers - those men who would remain with the ship whether or not she was in commission, were appointed by the Navy Board.
The ship's six Lieutenants were ranked in order of seniority, First, Second etc, based on the dates on which they had passed their Examinations. The First Lieutenant was clearly the most important of these and was the second-in-command and controlled the day-to-day organisation of the ship and her crew.
The Standing Officers were:
The Boatswain or Bosun. He was a man who had worked his way up through the ranks of seamen, with a great many years of experience of the sea. He was answerable to the First Lieutenant and was responsible for the operation, repair and maintenance of the ship's boats as well as her masts and rigging. When the ship was in commission, he was assisted by two Boatswains Mates. Amongst the duties of the Boatswains Mates was the administering of any floggings ordered by the Captain.
The Gunner. He was another man who had worked his way up through the ranks of seamen. He was responsible to the First Lieutenant for the maintenance, operation and repair of the ships main guns, the training of gun crews and training of Midshipmen in Ordinary in the art of gunnery. In action, his station was in the magazine, filling gunpowder cartridges to be taken to the gun captains by the powder monkeys. When the ship was in commission, he was assisted by two Gunners Mates and 20 Quarter Gunners, each of whom was a Petty Officer in charge of four gun crews.
The Carpenter. He was a fully qualified Shipwright who was answerable to the First Lieutenant for the repair and maintenance of the ships hull, frames and decks. When the ship was in commission, he was assisted a Carpenters Mate and had a dedicated crew of eight men.
The Purser. He was answerable directly to the Captain and was responsible for the purchase and distribution of all the ship's stores and provisions. While the ship was in the Ordinary, he was allowed to live ashore within a reasonable distance of the Dockyard.
The Cook. He was responsible to the First Lieutenant for the distribution and preparation of the ships provisions. He was also in charge of the ship's complement of servants.
The rest of the senior Warrant Officers were, like the Standing Officers, were appointed by the Navy Board and were:
The Sailing Master. He was the highest-ranking of all the ships Warrant Officers, was answerable to the Captain and so was entitled to live in the wardroom with the commissioned officers. He was a fully qualified Master, able to command a vessel in the merchant service when not employed by the Royal Navy. Of all the wardroom officers, he had the second-largest cabin, second only to that of the First Lieutenant. In a ship like HMS Hercules, he was assisted by a more junior but equally qualified Sailing Master, known as the Second Master and three Masters Mates. Each of the Masters mates was themselves a Qualified Mate, able to work as such in the merchant service. The Master was responsible for the day-to-day sailing and navigation of the ship, training the Midshipmen-in-Ordinary in the arts of navigation and seamanship and the storage of supplies and stores in the hold to ensure the optimum trim of the ship for manoeuvring. In addition to the Second Master and the Masters Mates, he was also assisted by six Quartermasters, each responsible for the ship's steering and each assisted by their own Mate.
The Surgeon. Also answerable directly to the Captain and so entitled to live in the wardroom with the commissioned officers. Although not a qualified Doctor as such, the Surgeon had had to complete a seven-year apprenticeship which had been overseen by the Royal College of Surgeons and the Royal College of Physicians. He was responsible for the day-to-day healthcare of the whole ship's Company from the Captain downwards and was assisted in this by two Assistant Surgeons.
The lesser Warrant Officers were appointed by the Captain on the recommendation of the First Lieutenant after having applied for the posts and presenting their credentials. These were:
The Armourer. He was responsible for the storage, maintenance and repair of the ships stocks of small-arms and bladed weapons. A qualified Blacksmith, he would also manufacture new bladed weapons as and where necessary. He was answerable to the Gunner and was assisted by two Armourers Mates.
The Sailmaker. Answerable to the Boatswain and responsible for the maintenance and repair of the ships sails and flags as well as their storage. He was assisted by a single Sailmakers Mate and had a dedicated crew of two men.
The Ropemaker. Also answerable to the Boatswain, he was responsible for the storage, maintenance and repair of the ship's supplies of cordage and the manufacture where necessary of new cordage.
The Caulker. He was answerable to the Carpenter and was responsible for ensuring that the ship's hull and decks remained watertight. He was assisted by a single Caulkers Mate and seamen as and when required.
The Chaplain. An ordained priest, he was answerable to the First Lieutenant. In deference to his status as an ordained priest, the Chaplain was entitled to live in the wardroom with the commissioned officers. In action, his role was to assist the Surgeon's crew with the care of wounded men. In the absence of a Chaplain, the Captain would carry out his pastoral duties.
The Schoolmaster. Answerable to the First Lieutenant, he was responsible for training the Midshipmen-in-Ordinary in the theory of navigation and the associated branches of arithmetic. Where possible and appropriate, he would also teach the rest of the ships boys the basic three Rs.
The Cooper. Answerable to the Purser, he was responsible for the maintenance and repair of all the barrels stored in the hold. He was responsible for cleaning the barrels after their contents had been used, especially barrels used to store the ship's water supply and would be assisted by seamen as and where required.
The Clerk. Answerable to the Purser, he was responsible for all the record-keeping and administration aboard the ship and ensuring that the appropriate books were sent to the Admiralty for checking.
The Master-At-Arms. In effect, he was the ship's policeman and was answerable to the First Lieutenant and was responsible for the day-to-day enforcement of discipline on the ship. He was assisted by two Corporals (not related to the military rank of the same name) who themselves had the status of Petty Officers. He would investigate misbehaving seamen and would report them to the First Lieutenant who would in turn report them to the Captain who would decide their punishment. In cases where the Captain decided that the offender should be flogged, the flogging itself would be carried out by the Boatswains Mates. In cases where the alleged offence required a Court Martial, the offender would be kept in irons until a Court Martial could be arranged and the Master-at-Arms would then be responsible for their safety and security.
A 74-gun ship of the line would have 16 Midshipmen, appointed by the Port Admiral or local commander-in-chief on behalf of the Admiralty. Commanders in training, their job was to assist the Lieutenants in their day-to-day duties.
In addition to the Midshipmen, there would be Midshipmen-in-Ordinary. Also known as Quarterdeck Boys, these young men were in effect officers in training. They would usually be the sons of friends of the Captain, or had a family connection to the Captain, or be sons of people the Captain was either doing a favour for or owed a favour to. They would be on the ships books as Captains Servants, rated and paid as Able Seamen but wore the uniform and performed the duties of a Midshipman. A ship with a crew of almost 600 would entitle the Captain to have as many as 24 servants or four per hundred of her Company, but unless he was extraordinarily extravagant, the Captain would only actually require a fraction of this number, so the remaining posts were taken up with the Midshipmen-in-Ordinary. The Quarterdeck Boys would have to put in two years of sea-service before they could be appointed as Midshipmen proper and would have to serve at least six years in the post of Midshipman before they would be considered for their Lieutenants Examination.
In any case, the Captain would come aboard with his own staff who would move between appointments with him, consisting of his own Clerk or secretary, his Steward, who would have a Stewards Mate to assist him and his Coxswain. The Captains Coxswain was a Petty Officer who was expected to act as the Captain's eyes and ears on the Lower Deck. The Coxswain himself would appoint a Coxswain's Mate from amongst the Able Seamen.
The rest of the ships crew would be made up with Petty Officers, those men with experience in those roles, such as Captains and Yeomen of Parts of the ship such as the Forecastle, the Waist, Tops, Gun Captains etc. Able Seamen; those men with plenty of sea-going experience who could perform any task asked of them without supervision, Ordinary Seamen; those men with some sea-going experience and Landsmen, those with none. Landsmen were the unskilled labourers in a ship and were generally regarded by everyone else as being the lowest form of life until they had proved themselves. Boys were graded in much the same way, 1st class - those with Able Seaman levels of skills and experience, 2nd class, those with Ordinary Seaman level skills and 3rd class. The Boys 3rd Class were employed as cabin servants for the wardroom and for those senior Warrant Officers entitled to have servants, such as the Standing Officers. In action, the ship's boys would be employed in carrying gunpowder cartridges from the magazine to the Gun Captains, a role known as a "Powder Monkey".
HMS Warspite's contingent of Marines would come aboard as a pre-existing unit and would consist of a Captain of Marines in charge, assisted by three Marine Lieutenants ranked in order of seniority, three Sergeants, three Corporals, two Drummers and 98 Marine Privates. The commissioned Marine officers were entitled to live in the wardroom with the commissioned sea-officers. The Marines themselves would live in a screened-off part of the Lower Deck, known as the Marine Barracks, while the non-commissioned officers would have the same status aboard the ship as the Petty Officers.
On completion, HMS Warspite was a ship of 1,579 tons. She was 165ft 9.5in long on her upper gundeck and was 46ft 11in wide across her beams. She was armed with 28 x 32pdr long guns on the lower gundeck, 28 x 18pdr long guns on her upper gundeck, 14 x 9pdr long guns on her quarterdeck and four more such guns on her forecastle. She was manned by a total of 550 officers, men, boys and marines. In addition to her main guns, she carried about a dozen half-pounder anti-personnel swivel guns attached to her quarterdeck and forecastle bulwarks and handrails and in her fighting tops. By the time she was complete, the construction of HMS Warspite at the shipyard had cost £26,285.19s 3d, with an additional £9,440.12s 11d being spent on fitting her out.
Dublin Class PlansOrlop Plan:

Upper and Lower Gundeck Plans:

Forecastle and Quarterdeck Plans:

Inboard Profile and Plan:

Sheer Plan and Lines:

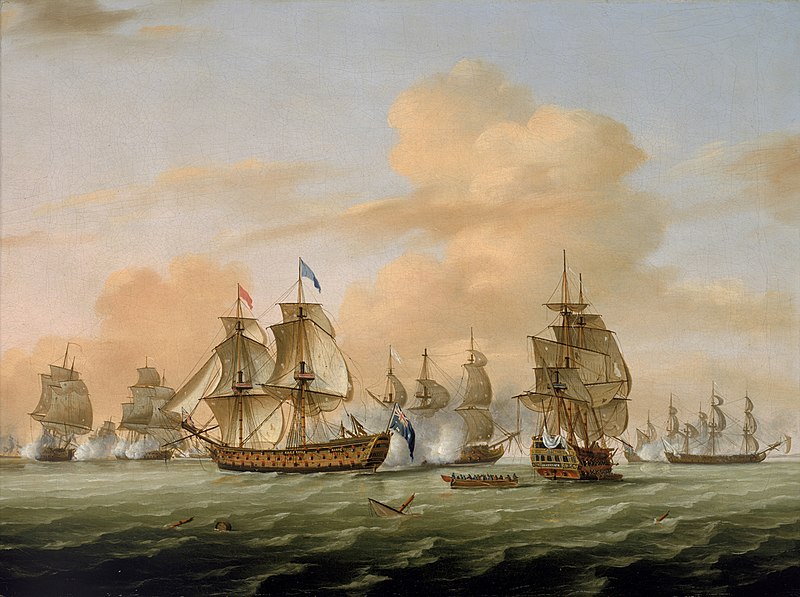
An unknown Dublin Class ship at sea painted by Charles Brooking. The small vessel stern-on in the foreground to the left is ketch rigged and is more than likely a Bomb Vessel. The ship in the background slightly left of centre may also be a ship of the line, but could equally be an East Indiaman.

Another view of a Dublin Class ship by the same artist. In this painting, the ship in the foreground is wearing the command flag of a Vice-Admiral of the Red, as indicated by the red flag on her fore mast:

The opening battles of the Seven Years War had gone badly for the British. The island of Minorca with the vital naval base at Port Mahon had been lost in June 1756. It had also gone badly ashore in America after the French managed to persuade many Native American Nations to fight alongside them and in Europe, the main British ally Austria had allied herself with the French. Things weren't helped by political instability at home. This changed in June of 1757 when a coalition was formed between two former political opponents, the Duke of Newcastle and William Pitt the Elder. Once a division of political responsibilities had been agreed between the two men, the Government was able to set a strategic policy which had been lacking before. In 1758, Pitt decided on a strategy to distract the enemy by attacking them in their overseas possessions and launching large scale raids or "Descents" on their own coast. This approach had a number of advantages. Firstly, it would divide the enemy forces by making them send troops and ships to defend their colonies and trading posts and secondly it would deprive the French of trade and therefore money. A series of amphibious assaults were launched on the French coast, their trading posts on the west coast of Africa and in the Caribbean were attacked and taken and plans were laid to take Quebec.
In early 1759, the British became aware of French plans for an invasion of Britain. This was to involve the transport of 100,000 French troops in a huge fleet of barges and flat-bottomed boats across the English Channel. The invasion fleet was to be built in Le Havre, Brest, Morlaix, Lorient and Nantes. Initially, the plans were to involve a Jacobite uprising in Scotland under Charles Stewart, the so-called Bonnie Prince Charlie, but this part of the plan was cancelled after the Young Pretender turned up to a meeting with the French military High Command late and drunk. Nevertheless, plans for the invasion continued to evolve such that by the summer of 1759, it had been decided that the invasion would be launched from Le Havre alone and that the hundreds of invasion craft should gather there to await favourable winds, to carry them to the Portsmouth area where they were to land. The British laid their own plans to counter the invasion threat. Admiral Sir Edward Hawke, commanding the Royal Navy's Channel Fleet was to mount a close blockade of the main French naval base at Brest to prevent them from being able to escort the invasion force across the English Channel, while troops were stationed on the Isle of Wight and shore batteries thrown up near likely landing sites. In the early summer, intelligence reached London that the French intended to try to send the fleet unescorted.
In late June 1759, Rear-Admiral Sir George Brydges Rodney was ordered to take a squadron of five ships of the line, five frigates, a sloop of war and six Bomb Vessels to Le Havre and destroy the invasion fleet. The subsequent Bombardment of Le Havre led to the French calling off plans to send the invasion fleet unescorted. An alternative plan was hatched to launch the invasion with the remaining invasion craft from Brest, to be escorted across the English Channel by the combined French Brest and Toulon Fleets and land at Maldon in Essex and in Scotland to support a planned Jacobite uprising, dividing the defending British.
Once the British became aware of the role the French Toulon Fleet was to play in the planned invasion, the Government ordered that the Mediterranean Fleet under Vice-Admiral Thomas Broderick be reinforced and HMS Warspite was one of a number of ships of the line detached from the Channel Fleet for this purpose. The reinforcements allowed Vice-Admiral Broderick to blockade the French in Toulon with someof his ships while keeping the rest at Gibraltar ready to pounce should the French fleet break out. The Government however, was not content just to reinforce the fleet in the Mediterranean. They ordered Vice-Admiral the Honourable Sir Edward Boscawen to take three more ships of the line from the Channel Fleet with some Frigates and other vessels and proceed to Gibraltar to take over command of the Mediterranean Fleet. Boscawen left Spithead as ordered on the 14th April and arrived on the 27th. Once he had issued his orders to the ships at Gibraltar and assigned patrol stations, he left to join Vice-Admiral Broderick off Toulon, arriving on 16th May.
The fleet now available to Vice-Admiral Boscawen now comprised the following ships of the line:
The Second Rate ships HMS Namur and HMS Prince (both of 90 guns), the Third Rate ships of the line HMS Newark (a three-decked ship of 80 guns, originally built in 1695 and rebuilt to the 1741 Amendment to the 1719 Establishment), HMS Warspite and HMS Culloden (both of 74 guns), HMS Conqueror and HMS Swiftsure (both of 70 guns), HMS Edgar and HMS St Albans (both of 64 guns), the Fourth Rate ships HMS Intrepid, HMS America, HMS Jersey and HMS Princess Louisa (all of 60 guns), with HMS Guernsey and HMS Portland (both of 50 guns).
Accompanying the ships of the line were the 44-gun two-decker HMS Rainbow, the Frigates HMS Ambuscade (ex-French, 12pdr-armed, 40 guns), HMS Active (12pdr, 36), HMS Thetis (12pdr, 32), the Post-Ships HMS Lyme, HMS Sheerness, HMS Glasgow HMS Tartars Prize and HMS Gibraltar (all of 24 guns) with the Sloops of War HMS Favourite and HMS Gramont (both of 16 guns) and the Fireships HMS Aetna and HMS Salamander (both of 8 guns).
Admiral Sir Edward Boscawen, painted by Joshua Reynolds in 1756:

The French fleet in Toulon was commanded by Rear-Admiral Jean-Francois de Bertet de Sabran, the Compte de la Clue. By the time Boscawen implemented his blockade, they were almost ready to put to sea. On the 8th June, Boscawens's ships sighted a pair of French frigates and chased them into a fortified bay near Toulon. Boscawen ordered HMS Jersey, HMS Culloden and HMS Conqueror to put into the bay and destroy them. As they entered the bay to carry out their orders, the British ships became becalmed and came under heavy fire from the shore batteries and were badly damaged before they managed to extricate themselves. The British continued their blockade but were forced by a lack of provisions to lift the blockade and return to Gibraltar. HMS Lyme was ordered to patrol off Malaga and HMS Gibraltar was ordered to patrol between Estepona and Cueta to keep an eye out for the French. On the 17th August, HMS Gibraltar sighted twelve French ships of the line and three Frigates off the coast of Morocco headed west towards the Atlantic Ocean. Captain William McCleverty ordered that his ship head to Gibraltar under all sail to warn his admiral about the oncoming French fleet.
When HMS Gibraltar arrived off Europa Point at 19:30, they found that the British fleet was still refitting and taking on stores, but despite this, the fleet was at sea by 22:00. The leading group of British ships, HMS Namur (Boscawen's flagship), HMS Culloden, HMS Warspite, HMS Swiftsure, HMS Intrepid, HMS America, HMS Portland and HMS Guernsey sighted the French at about 07:00 on the 18th August. At the same time, Vice-Admiral Broderick in HMS Prince with the rest of the fleet was some miles behind them. When the enemy was sighted, they only saw seven French ships of the line and it turned out afterward that the rest of de la Clue's ships had put into Cadiz during the night without orders. The French admiral did not order his ships to form aline of battle or prepare for action because he thought that Boscawen's ships rapidly catching up with him were actually his own. At 09:00, Boscawen ordered his rear-most ships to make more sail. His intention was to exploit the enemy admiral's mistake and get in front of the French vanguard before they realised their mistake and made more sail themselves. At 13:25, Boscawen ordered his leading ships to engage the enemy. At 14:30, HMS Culloden opened fire on the rear-most of the French ships, the Centaure (74). Very soon after this, HMS Warspite, HMS America, HMS Portland and HMS Guernsey got stuck in. At 16:00, HMS Namur joined the action and Boscawen ordered HMS Swiftsure and HMS Intrepid to push on and engage the foremost of the French ships. By 16:30, HMS Namur was alongside the French flagship L'Ocean of 80 guns, but after half an hour, her mizzen mast, fore and main topsail yards had been shot away, the ship became disabled and began to fall behind the chase. The French admiral on seeing this, ordered his fleet to make all sail and try to escape. The Centaure by this time had had her fore and main topmasts shot away and had no choice but to surrender.
Vice-Admiral Boscawen was absolutely determined not to allow the damage to his flagship to prevent his destruction of the enemy, ordered his barge to be launched and he made his way to HMS Newark to continue leading the fleet. By the time his command flag was hoisted aboard HMS Newark, the fighting had pretty much ceased and the chase had restarted. Under the cover of darkness, two of the French ships, Guerrier and Souvereign (both of 74 guns), altered course and escaped, so that when the sun rose on the 19th August 1759, only four French ships of the line could be seen, L'Ocean (80), Temeraire and Redoutable (both of 74 guns) and Modeste (64). The British were three miles astern and Lagos in then-neutral Portugal was fifteen miles away and it was for there that de la Clue decided to head.
At 09:00, L'Ocean ran aground on the rocks outside the harbour at Lagos and had been mostly abandoned while the other ships anchored under the shore batteries. On seeing this, Vice-Admiral Boscawen sent HMS Intrepid and HMS America to destroy L'Ocean, which had been dismasted by the impact with the rocks. HMS Intrepid anchored near L'Ocean and did not carry out the order, while HMS America closed to within point blank range and fired a few guns into the now helpless French ship. The French admiral had by now been taken ashore. Captain James Kirke of HMS America sent men across to the French ship with orders to evacuate anyone found aboard and then set fire to her. HMS Warspite was ordered to go in and capture the Temeraire and brought her out wth very little damage while the Modeste was also captured. The Redoutable was found to be bilged and was burned.
In the Battle of Lagos, the British suffered casualties across the fleet of 56 killed and 196 wounded. French casualties were much more severe, with over 500 killed, wounded or captured. Vice-Admiral Boscawen sent Captain Matthew Buckle of HMS Namur back to the UK in HMS Gibraltar with his despatches, where Buckle was received personally by the King and was presented with £500 with which to buy a sword. Once the ships had returned to Gibraltar and made their repairs, Vice-Admiral Boscawen returned to the UK in accordance with his orders in HMS Namur, together with HMS Warspite, HMS America, HMS Swiftsure, HMS Portland, HMS Intrepid, HMS Aetna and HMS Salamander with the Modeste and the Temeraire. HMS Edgar, HMS Princess Louisa and the Centaure followed later while Vice-Admiral Broderick resumed his blockade of Cadiz. The captured French ships were all taken into the Royal Navy under their French names. For his part in the victory, Captain Bentley was knighted.
The Battle of Lagos by Richard Paton:

Another view of the battle, this time painted by Thomas Luny:
A map showing the location of the battle:

Despite their defeat at the Battle of Lagos, French plans for the invasion of the UK were not affected and the French ships trapped in Cadiz were under orders to break the blockade and make their way to Rochefort as soon as they were able to.
The Royal Navy still faced the threat from the French Atlantic Fleet, so the ships which left the Mediterranean with Vice-Admiral Boscawen including HMS Warspite were immediately returned to the Channel Fleet and were employed on a close blockade of the French Atlantic ports. In the first week of November 1759, Hawke's fleet was forced leave their blockade stations to run into Torbay to escape a fierce storm. The French, under the Marshal the Compte de Conflans took the opportunity to put to sea. The French force was under orders to rendezvous with and escort a fleet of troopships waiting in the Golfe de Morbihan to Scotland and mount the invasion there. On 14th November 1759, Conflans and his fleet left Brest and were spotted by the frigate HMS Actaeon that day. On the 15th November, Hawke ordered the fleet to weigh anchor from Torbay and the following day was informed by Captain McCleverty of HMS Gibraltar that the French Brest Fleet had sailed and had been seen 24 leagues (72 miles) to the north-west of Belle Isle. Hawke immediately ordered the fleet to head for Quiberon Bay under all possible sail, guessing that the French fleet would head that way in order to break the blockade and free the transport ships trapped there.
At this stage, Hawke's Channel Fleet comrised the following ships of the line:
HMS Royal George (100), HMS Namur, HMS Union and HMS Duke (all Second Rate ships with 90 guns), HMS Mars, HMS Warspite, HMS Hercules, HMS Torbay, the ex-French HMS Magnanime, HMS Resolution and HMS Hero (all of 74 guns), HMS Swiftsure, HMS Dorsetshire, HMS Burford, HMS Chichester and HMS Temple (all of 70 guns), HMS Revenge and HMS Essex (both of 64 guns), HMS Kingston, HMS Intrepid, HMS Montagu, HMS Dunkirk and HMS Defiance (all of 60 guns), HMS Portland, HMS Falkland, HMS Chatham and HMS Rochester (all of 50 guns).
The four 50-gun ships had been left behind to blockade the French transport ships and had been placed under the command of Commodore Robert Duff.
The frigates accompanying the fleet were:
HMS Venus (12pdr, 36), HMS Minerva and HMS Sapphire (both 12pdr, 32), HMS Vengeance, HMS Maidstone and HMS Coventry (all 9pdr, 28).
HMS Warspite had been assigned to the Vanguard Division, led by Vice-Admiral Sir Charles Hardy, flying his command flag in HMS Duke.
With his ships beating into the teeth of a south-easterly gale, Hawke and his fleet were delayed in their arrival at the Bay. On the 19th, the wind eased and Hawke ordered the frigates HMS Maidstone and HMS Coventry to sail ahead and scout for the enemy. Early the next morning, Hawke also ordered HMS Magnamime to sail ahead of the fleet to support the two frigates
On the night of the 19th November, Conflans ordered his fleet to reduce sail in order to arrive at Quiberon Bay the following morning, rather than in the middle of the night. Early the following morning, the French force spotted sails which turned out to be those of Commodore Duff's squadron. Realising that the strange sails belonged to a small squadron rather than a full fleet, Conflans ordered his fleet to give chase. Duff split his force into two, north and south, pursued by the French vanguard and centre. The rear of the French fleet peeled off to investigate strange sails appearing to the West. These turned out to be the British Fleet with 24 ships of the line, led by Admiral Hawke in HMS Royal George. The French broke off their pursuit of Duff's squadron and retreated back into the Bay. This enabled Commodore Duff's squadron to rejoin the main body of the fleet.
At 08:30 on the 20th November 1759, HMS Maidstone signalled Sir Edward Hawke aboard HMS Royal George that she had sighted a fleet. At 09:45, HMS Magnanime signalled the flagship that she had the enemy in sight. Hawke immediately ordered the fleet to form a line abreast. This was followed shortly afterwards by a signal ordering the seven ships nearest the enemy to give chase and attempt to hold them up for long enough for the main body of the fleet to come up and force a general engagement.
Realising the British were upon them, the French fell into confusion, but soon recovered and began to form a line of battle to meet the oncoming British fleet. While the French were attempting to form their line of battle, Conflans realised that Hawke's fleet would be all over them before the manoeuvres were complete. He figured that since he knew the Bay with it's labyrinth of sandbanks, rocks and treacherous currents, while the British were in unfamiliar waters in deteriorating weather, he had the advantage. His priority became keeping his fleet together and ordered the French fleet to head for the land, twelve miles away, hoping to tempt Hawke to follow. With the wind from the North-West or North-North-West and increasing in strength, both fleets crowded on sail, the French to escape and the British to catch them. At 14:00, the French rear opened fire on the British vanguard and half an hour later, Hawke gave the order to engage the enemy.
A short while later, HMS Resolution, HMS Magnanime, HMS Revenge, HMS Torbay, HMS Montagu, HMS Swiftsure and HMS Defiance got stuck into the French rear. The flagship of the French Rear Division, the 80-gun ship Le Formidable was engaged in passing by these ships until HMS Resolution came alongside and engaged her at point blank range. With the French Rear-Admiral and over 200 of her men dead and battered to a floating wreck, Le Formidable surrendered. The French Seventy-Four Thesee was engaged first by HMS Magnanime and then by HMS Torbay. Her commander refused to order his lower gundeck gunports to be closed in his determination to fight off the British attacks and as a result, while engaged against HMS Torbay in the heavy seas, the Thesee foundered, taking all but 20 of her 800-man crew with her. The French ship Superbe of 70 guns received a full broadside at point blank range from HMS Royal George and capsized. Captain Lord Howe of HMS Magnanime then saw the French Seventy-Four L'Heros laying crippled downwind of him, brought his ship alongside and forced them to surrender. In the heavy seas, Lord Howe was unable to send a boat across to accept the Frenchman's surrender.
By this time, it was getting dark. The British had no pilots and unreliable charts, so Hawke ordered the fleet to anchor where they were and await daybreak. He knew he had the upper hand in the battle. Unfortunately, the signal to anchor for the night was in the form of two guns fired in rapid succession from the flagship, but with several of the British ships still engaged against the enemy and with a full gale howling through the rigging, the signal wasn't heard by everybody. With the coming of darkness, some of the British ships anchored, some headed back out to the safety of the open sea.
On the morning of the 21st November, Sir Edward Hawke found that HMS Resolution had gone aground on the Four Bank in the night and that the French flagship, Le Soleil Royal of 80 guns had anchored in the middle of his fleet. Realising her situation, Conflans ordered that his flagship cut her anchor cable and get away, but the ship ended up going aground off the town of Croisic. L'Heros had also tried to get away in the night but had also gone aground on the Four Bank. Seeing the French flagship getting under way, Hawke ordered HMS Essex to give chase, but before long, that ship too joined the others on the Four Bank.
The rest of the French fleet managed to get away in the night. On the 22nd, the French set their flagship on fire and men sent by Hawke burned L'Heros.
Vice-Admiral Sir Edward Hawke and his men had won a stunning victory. The British had lost two ships of the line wrecked and suffered 400 casualties across the fleet. The French on the other hand had lost six ships of the line wrecked, sunk and captured with many others battered to floating ruins. Over 2,000 French sailors had died in the Battle. Despite the victory, Admiral Hawke was disappointed with the result. He was later to state that if he had had two more hours of daylight, he might have taken the whole enemy fleet.
The tracks of the fleets in the lead-up to the Battle of Quiberon Bay:

The Battle of Quiberon Bay, painted by Nicholas Pocock in 1812.

The loss of the French 74-gun ship Thesee during her duel with HMS Torbay (74)

The aftermath of the battle - HMS Resolution (74) lies on her side on the Four Shoal while the French ships Le Soleil Royal and L'Heros lie aground in flames behind her:

The scale of Admiral Hawke's victory had consequences for the rest of the war. The power of the French fleet was broken and did not recover until after the war. The French were unable to resupply their army in Canada and this in turn led to the eventual British victory there. In addition, the French Government suffered a credit crunch as financiers realised that the Royal Navy could now strike French possessions anywhere in the world at will and refused to lend the French Government any more money. The French Government was forced to default on it's existing debts in order to continue the war.
On the 7th May 1761, Captain Sir John Bentley was appointed a Commissioner of the Navy Board and left the ship. He resigned from the Navy Board on 28th December 1763 on being promoted to Rear-Admiral, but held no further sea-going appointments. Promoted to Vice-Admiral on the 18th October 1770, he died on 3rd January 1772.
Captain Bentley's replacement in HMS Warspite was Captain William Saltern Willett. Captain Willett had passed his examination for Lieutenant on the 23rd July 1741 and had first been made Master and Commander in the Sloop of War HMS Kingfisher on the 27th December 1745. First Posted on the 1st October 1747, his appointment prior to HMS Warspite had been in HMS Chichester (68).
On the 11th December 1761, HMS Warspite sailed for the Mediterranean again and remained there until the end of the war.
On the 15th February 1763, the Treaty of Paris was signed, ending the war. For the British, Pitt's strategy of amphibious assaults on key strategic points on the French coast and of capturing both French and Spanish overseas possessions had effectively won the war. France, unable to trade and generate the money needed to conduct the war, had suffered a credit crunch as financiers refused to loan the French government of King Louis XVI the money needed. This had left them unable to defend their overseas colonies and had led to a vicious circle where defeat had followed defeat. The British had taken French and Spanish colonies in the Caribbean, North America, India and as far away as the Philippines, where the jewel in the crown of Spanish possessions in the far east, Manila, had been taken. Florida and Havana in Cuba had also been lost. The Treaty had forced the French to cede all of French Canada and all the territory in North America between the Appalacian Mountains and the Missisippi River.
On the 5th May 1763, HMS Warspite received orders to return to Portsmouth, where she paid off into the Ordinary. The ship was stripped of her sails, yards and running rigging and was moored in Portsmouth Harbour under the care of a skeletoncrew of her Standing Officers, their servants and 26 Able Seamen. She became the responsibility of the Master Attendant at the Dockyard. Any maintenance or repairs beyond the capabilities of her crew would be carried out by gangs of labourers sent to the ship by the Master Attendant.
Between November of 1764 and February of 1765, the ship underwent a small repair at Portsmouth Royal Dockyard before she was returned to her mooring.
Outside this little world, 1765 saw the start of the sequence of events which was to lead to the next war. Struggling under the huge debts run up during what was the first real world war in the true sense of the phrase, the British government began to directly levy taxes on the American colonies. The colonists, although happy to pay taxes intended for the running of local Governments and duties intended for the regulation of trade, objected to the imposition of taxes from London, over which they had no say at all. Political debate grew into protests, not just over the taxes themselves, but also over the draconian and increasingly heavy-handed methods used to enforce them. Protests grew into riots and from 1775, armed rebellion. In 1776, after the American rebels had driven the British from their stronghold at Boston and the part-time soldiers of the colonial militias had won two victories over the regular troops of the British Army at Saratoga, the French began to supply them with arms and money. With the war in America going badly for the British, the French saw an opportunity to regain the possessions and prestige they had lost in the Seven Years War. King Louis XVI calculated that with the British bogged down in a seemingly never-ending war of attrition in North America, they would be unable to prevent the French expanding the scope of the war should they become openly involved in it. This was a move the British feared and attempted to head off by appointing a commission to negotiate an end to the war with the Americans by offering major concessions. The French, fearing this, offered the Americans unlimited military assistance and financial aid in return for a commitment to seek nothing less than full and complete independence. On February 6th 1778, the American Rebels and the French signed the Treaty of Amity and Commerce and a month later, Britain declared war against France.
HMS Warspite was not to play an active role in this new war. On the 7th March 1780, the ship was renamed to HMS Arundel and was fitted out as Hospital Ship and Receiving Ship for Portsmouth. She remained in this role in Portsmouth until February of 1782, when she paid of again and returned to the Portsmouth Ordinary. She was recommissioned again in the same role as part of the mobilisation of the fleet for the Spanish Armaments Crisis in September of 1790, but was paid off again in December. She was to remain in the Portsmouth Ordinary until November of 1801, when she was taken into the Royal Dockyard and was broken up.


